Saturday 10 July 2021

ICM KDA-1 Drone 1/48th 


ICM's little range of drones started to appear early in 2021, and they are typically modern ICM - that is to say beautifully moulded, beautifully presented (good sturdy boxes count!) and great value at around £13-14 each of you look around. This quick build will cover the first release, that of the KDA-1 variant, a stumpy little jet target used in it's thousands since the early 1950s.


As you can see it's a neat little package, starting from the box art and carrying through the entire model. The intention is to do this one quite quickly - sort of "between projects" palate cleanser, so I will be using a few speedy techniques. 

The first thing was to deal with a few little sub-assemblies. The intake has a piece of trunking for each half - beware that it doesn't sit flush to the fuselage except at the front, it's creating a tunnel that doesn't follow the inner fuselage contours. As you can see I used a thick CA for this - it's a technique that speeds things up, but you do have to be sure of your fit, as you don't have much play time! But if you have the confidence, extensive use of CA can speed up the process greatly


Once in place I added a dab of CA with acrylic resin powder in to each space at the top - this is for nothing more than reinforcement when cleaning the joint up, it's not strictly necessary, but I'm a "belt&braces" kinda guy so in it went!


The intake seam was dealt with using some 400 grit wet and dry wrapped around a suitable tubular form - in my case a micro chisel handle. Wet sanding and polishing dealt with this in minutes. In fact  the total time from opening the box to having the seams in the trunking dealt with was less than 30 minutes - speed!


There is an intake bullet on this drone, and it comes in two halves. Again, for speed I used CA. I can't stress enough how important it is to test fit and be absolutely certain of your join before running CA into it - get it wrong and you have a major recovery job in your hands, but with care it's a great way to build. I slightly bevel each edge of the join to give the superglue a channel to run into. A couple applications and you can sand the seam perfectly smooth. It also means you won't get a ghost seam - EVER. 


The wings are in simple halves, and were glued together with Tamiya's white label cement. This is a slightly thicker cement than their extra thin or quick setting, but I find it very useful for lots of tasks. I applied a thin coat to each wing half and then let it sit for a minute or so before bringing the parts together.  This allows it to soften the plastic but also allows the majority of the solvent to evaporate, meaning you end up with slightly softened plastic, but hopefully none of the solvent will be trapped and end up causing sinkage or rippling on the thin parts when bought together, 


When dry the straight leading and trailing edges were lightly sanded with some wet and dry taped to a piece of tee-al to ensure it remains absolutely straight. Keeping a straight leading edge is especially important on this type of model, as any variation will be very apparent. With the bulk of the material removed on the seam, one can switch to sanding sponges or wet & dry to finish the surfaces off.


The interior was given a quick spray with Alclad jet exhaust after assembling and cleaning up the jet pipe. Little visible here so no more than a quick blast through in case anyone decides to inspect it!  The fan blades were sprayed Tamiya  LP-11 silver and given a wash with Tamiya black panel line accent


This is just an image to again show how the mating edges are slightly bevelled when I'm going to use superglue for joining. The area behind the upper fairing will be joined with a very small bead of Tamiya quick setting because there's some detail there that I want to preserve with minimal sanding, but the rest will be done with CA. 


After dealing with any seams that needed attention, any that were eradicated were restored with a needle in a pin chuck and some vinyl tape as a guide. The model will be painted almost entirely in subassemblies and bought together at the end. So things like the intake bullet and tip pods were mounted to toothpicks for painting


Shot showing the seam lines and where the bevelling edges allows superglue to flow in allows perfect seam sanding and polishing.


You can see the intake seam dealt with here. Clearly visible is the way the rear bulkhead and fan face has a quite visible gap between it and the intake trunk - this is not something I worry about as the bullet will hide nearly all of it when inserted, and it will allow easier masking. 


I also took the opportunity to assemble the cart the Firebee attaches to when complete (and not on a pylon!). It's an easy quick assembly and gives a good way to show the drone off as it has no  undercarriage.
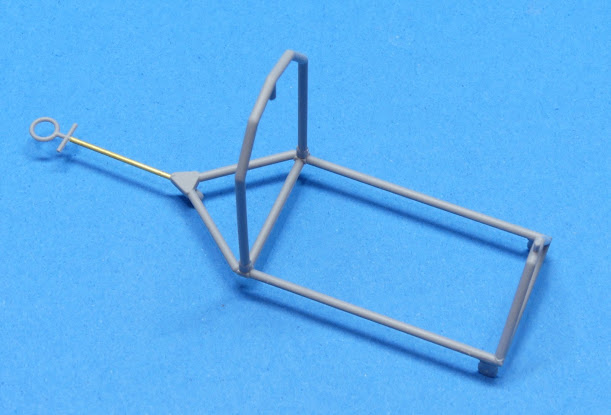


I did remove the main part of the towing bar and replace it with some Albion Alloys tube, as it was probably simpler and quicker than trying to deal with the seam line on that bit!

And so to painting! I'm uncertain whether I will simply add it here or do a new blog entry for painting. . .to be determined! Thanks for looking, stay tuned and please drop a comment.


Thursday 8 July 2021

 Zvezda Beriev Be-200, 1/144th Scale

So this then is the little Zvezda Beriev Be-200 flying boat. Typically Zvezda for these times. It fits a dream, and is a really beautifully presented package. Tooling wise some things could be a little better - Zvezda usually nail build and fit these days, but sometimes their surface finishes can let them down slightly. In this instance with clear machining marks on some exterior surfaces, and inconsistent depth to some of the engraved detail.

The slightly odd shape of the aircraft leads to some early building decisions, obviously in this case leaving the floats and engines off until the end of painting and final assembly, but fit is good enough that a dab of superglue is all that's needed to secure them. Tailplanes were also left off and painted separately. 


The model was not primed before painting, the initial coats doing the job fine, but in all honestly assembly is so good that there was little call for it. 

Initial paint was 3-4 light coats of Mr Color GX1 Cool White thinned with Mr Color thinner and wet sanded between coats with Trizact 3000 grit. This allowed a slow, solid build up of paint without losing detail. The light grey for the lower fuselage sides is Mr Color 16440 light gull grey, and the undersides of the hull is GX5 Susie Blue. A few coats of Mr Color GX112 UV cut gloss were applied heavily thinned and then sanded back again to get a smooth surface before applying decals. Decals are well printed and tough enough to withstand handling - which is good because things like the waterline marking are ultra thin and need lots of alignment!


After the decals were dry another couple of coats of GX112 were applied, and then the whole model was wet sanded with Trizact before moving on to final polishing, which was done with lint free tissue and light cut Turtle Wax polishing compound. This is applied and polished quite liberally to bring up a deep shine. Final assembly was then carried out including undercarriage and other details. 


This kit makes into a small model of a very attractive, unique type, and the lack of difficulty with building means it can be recommended to all but the very beginner - although the finishing may present other challenges, but fortunately there is an alternate Russian Navy scheme in dark grey and light blue included if lots of bright colours put you off. Highly recommended!

                       My thanks to The Hobby Company for the model. 


Wednesday 7 July 2021

 The Beaufort Scale. . . . 


Now that's a great piece of box art! A few months ago Spencer Pollard and I had discussed a joint build of this model. Not a challenge, not a race - just two people building the same model and talking about the experience. No axes, no controversy, no edgy attempts to be cool. Just two people, building the same kit, and talking about it. No rules, a nominal time span to maintain focus but nothing more. 

It got sort of back-burnered because of changes, especially in Spencer's professional life. However, Mr Pollard asked just this morning if I was still up for it - well, yes, yes I am. So we're talking about going ahead after we've both wrapped current projects up.

It's also an opportunity to use my blog again, which has had very little use in spite of always being there. Why blog rather than conventional social media? Well, in a word, control. Control over format, appearance, image quality, no intrusive "help" from Facebook's appalling Creator Studio. I'm hoping I can drive traffic here from my social media - it uses me for advertising, so I'm going to use it for the same. At least have the illusion of a two way relationship! I'm especially tired of how bad the compression is on images shared on social media, and how quickly stuff disappears, and lets say "algorithmic shenanigans" cutting people out of seeing my content apparently at random. 

So, I'm going to try this. Please leave a comment, tell me what you like, how you got here. Not being social media does not mean it can't be a community. So please, get involved. 

Late edit :- We're delighted to welcome the Iwata Princess herself, Jennifer Wright to the upcoming shenanigans! I'm starting to feel outgunned already. . .

Tuesday 6 July 2021

Airbus Progress

Not much to report in all honesty. .the Delfin is in final assembly prior to varnish and weathering, so hopefully some pics soon-ish! But I did a little more to the baby Airbus. All the joins were dealt with and some primer sprayed on.  The eagle eyed will notice my use of black primer. . . 


Now, this isn't any attempt at "black basing" or anything like that. . . it's simply that the truth is that the best way to spray white is over black. Counter intuitive maybe, but white is a surprisingly dense colour, and spraying it over black will take the guesswork out of knowing when you've got good coverage. No looking at your final white finish and having your eyes play tricks on you. 


This is GSI Mr Surfacer 1500 black. As you can see it's rougher than I'd have liked - as an experiment I used normal cellulose thinner instead of Mr Color levelling thinner like I normally would. Now I know EXACTLY why I use levelling thinner!  No worries, it'll smooth down fine with some fine micromesh. So hopefully I can start painting this in it's BA scheme sometime soon.

That's all, see you soon!
More checks

Masking canopies

Sometimes I want a canopy in place while spraying the main colours on an aeroplane. I always like the windscreen to be glued and faired, but sometimes want the main canopy open on the finished model, but it would help to be able to paint it on the model. So how to seal your cockpit closed and prevent overspray getting inside?

The following method works for me, and I've done a simple photo essay to show how I do it. I take no credit for the technique, that belongs to, if I remember, Dave Aungst, who showed it on a forum years ago. I've not seen it much discussed since, but it does work, and I thought I'd refresh the technique for people. Enjoy!


And that's it! Try it, it really works.

TTFN!

7th July 2021 check for sequencing

BE-200

Just a quick test image from my phone showing the Be-200 with engines, floats and tailplanes on, just the undercarriage to go and she'll be finished. 


Academy A-10 first steps

 So I've been waiting for this for a while, and finally picked one up this morning and started immediately.  The kit is beautifully moul...