ICM KDA-1 Drone 1/48th
ICM's little range of drones started to appear early in 2021, and they are typically modern ICM - that is to say beautifully moulded, beautifully presented (good sturdy boxes count!) and great value at around £13-14 each of you look around. This quick build will cover the first release, that of the KDA-1 variant, a stumpy little jet target used in it's thousands since the early 1950s.
The intake seam was dealt with using some 400 grit wet and dry wrapped around a suitable tubular form - in my case a micro chisel handle. Wet sanding and polishing dealt with this in minutes. In fact the total time from opening the box to having the seams in the trunking dealt with was less than 30 minutes - speed!
As you can see it's a neat little package, starting from the box art and carrying through the entire model. The intention is to do this one quite quickly - sort of "between projects" palate cleanser, so I will be using a few speedy techniques.
The first thing was to deal with a few little sub-assemblies. The intake has a piece of trunking for each half - beware that it doesn't sit flush to the fuselage except at the front, it's creating a tunnel that doesn't follow the inner fuselage contours. As you can see I used a thick CA for this - it's a technique that speeds things up, but you do have to be sure of your fit, as you don't have much play time! But if you have the confidence, extensive use of CA can speed up the process greatly
Once in place I added a dab of CA with acrylic resin powder in to each space at the top - this is for nothing more than reinforcement when cleaning the joint up, it's not strictly necessary, but I'm a "belt&braces" kinda guy so in it went!
The intake seam was dealt with using some 400 grit wet and dry wrapped around a suitable tubular form - in my case a micro chisel handle. Wet sanding and polishing dealt with this in minutes. In fact the total time from opening the box to having the seams in the trunking dealt with was less than 30 minutes - speed!
There is an intake bullet on this drone, and it comes in two halves. Again, for speed I used CA. I can't stress enough how important it is to test fit and be absolutely certain of your join before running CA into it - get it wrong and you have a major recovery job in your hands, but with care it's a great way to build. I slightly bevel each edge of the join to give the superglue a channel to run into. A couple applications and you can sand the seam perfectly smooth. It also means you won't get a ghost seam - EVER.
The wings are in simple halves, and were glued together with Tamiya's white label cement. This is a slightly thicker cement than their extra thin or quick setting, but I find it very useful for lots of tasks. I applied a thin coat to each wing half and then let it sit for a minute or so before bringing the parts together. This allows it to soften the plastic but also allows the majority of the solvent to evaporate, meaning you end up with slightly softened plastic, but hopefully none of the solvent will be trapped and end up causing sinkage or rippling on the thin parts when bought together,
When dry the straight leading and trailing edges were lightly sanded with some wet and dry taped to a piece of tee-al to ensure it remains absolutely straight. Keeping a straight leading edge is especially important on this type of model, as any variation will be very apparent. With the bulk of the material removed on the seam, one can switch to sanding sponges or wet & dry to finish the surfaces off.
This is just an image to again show how the mating edges are slightly bevelled when I'm going to use superglue for joining. The area behind the upper fairing will be joined with a very small bead of Tamiya quick setting because there's some detail there that I want to preserve with minimal sanding, but the rest will be done with CA.
After dealing with any seams that needed attention, any that were eradicated were restored with a needle in a pin chuck and some vinyl tape as a guide. The model will be painted almost entirely in subassemblies and bought together at the end. So things like the intake bullet and tip pods were mounted to toothpicks for painting
Shot showing the seam lines and where the bevelling edges allows superglue to flow in allows perfect seam sanding and polishing.
You can see the intake seam dealt with here. Clearly visible is the way the rear bulkhead and fan face has a quite visible gap between it and the intake trunk - this is not something I worry about as the bullet will hide nearly all of it when inserted, and it will allow easier masking.
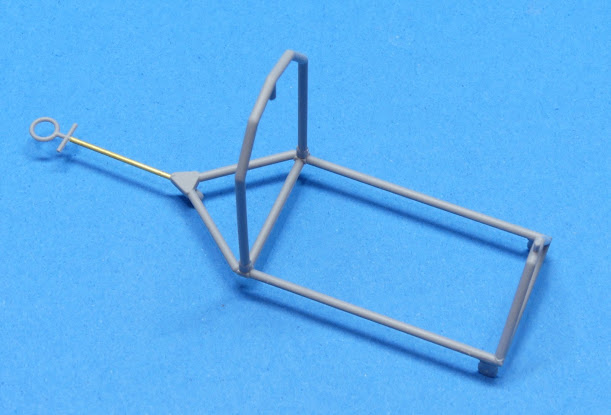
I also took the opportunity to assemble the cart the Firebee attaches to when complete (and not on a pylon!). It's an easy quick assembly and gives a good way to show the drone off as it has no undercarriage.

I did remove the main part of the towing bar and replace it with some Albion Alloys tube, as it was probably simpler and quicker than trying to deal with the seam line on that bit!
And so to painting! I'm uncertain whether I will simply add it here or do a new blog entry for painting. . .to be determined! Thanks for looking, stay tuned and please drop a comment.


No comments:
Post a Comment