Saturday, 29 October 2022

Hamp Day Six

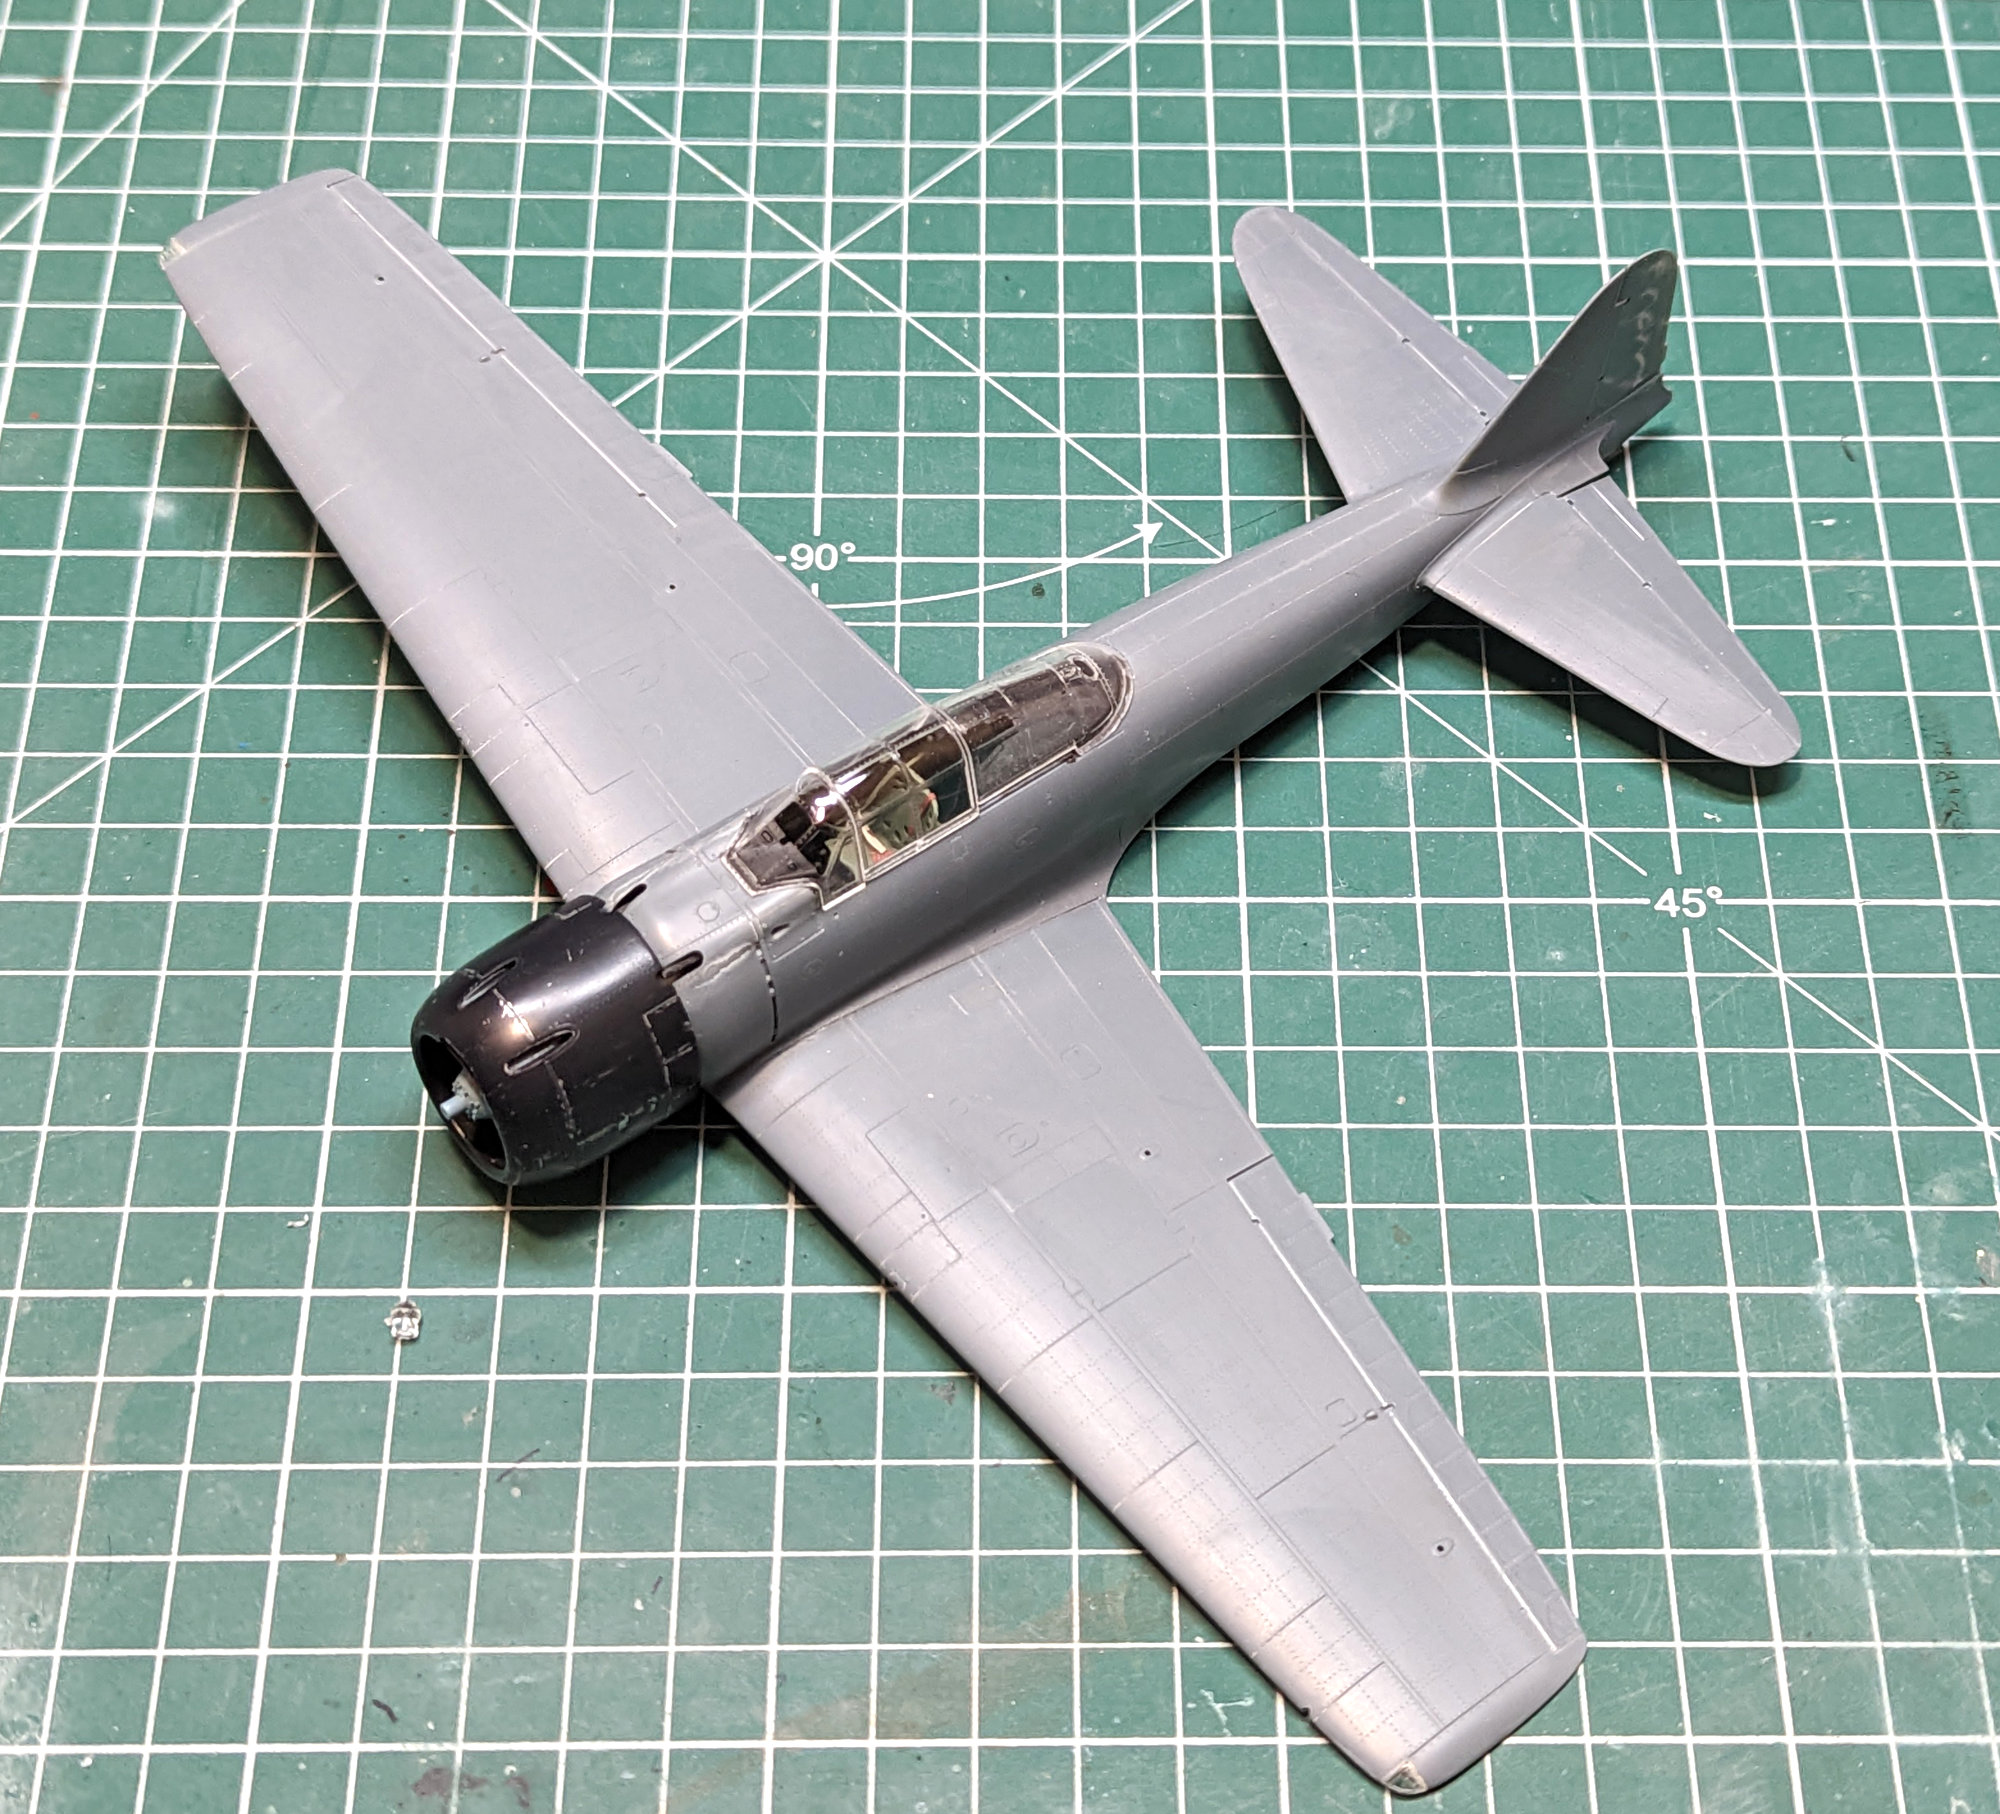
 A few days where little got done due to work and, on Thursday at least, extreme tiredness (I hate earlies!), but plodding through an hour or so's work per night on tidy up, seem checking and some masking and stuff. 


Obviously the engine and cowling will be popped off prior to painting! I just like adding them for pictures. The plan is to complete the model with all markings in the overall amber grey with all markings added (mainly sprayed on) and then spray the dark green mottle on top to allow it to look field applied.


I'm trying out a more complete assembly before painting here. For twenty or more years I've ribbed my good friend Craig Sargent on how incredibly complete he gets his models before painting. . . it always looks like a recipe for disaster to me, with so many fragile parts to work around. But on the other hand he is one of the very best modellers I know, so there must be SOMETHING in it, right?!? So we'll see how clumsy I am, and how much I'll break painting it!

See you after paint. . . I hope.

Wednesday, 26 October 2022

Hamp Day Three

 I have to say, this being my second one of these this year, that unless something pretty spectacular happens in the next two months, of the kits I've built in 2022, this is going to be my KOTY. It's simply delightful. Two tiny dabs of filler on the fuselage in front of the windscreen on the top. And I could have avoided that with more care. 


And on the underside, a shim of .25mm plastic sheet at the rear of the lower wing join was all that was needed to make fit pretty much perfect. 


And with that most of the assembly is done in three days from opening the box. Some details, canopy and masking, and we're off to the paintshop.

Stay tuned!


Sunday, 23 October 2022

Zero Sum Game From Eduard

 Earlier in the year I picked up the Eduard A6M Zero kit. I generally don't have much interest in Japanese WWII subjects - nothing against them, just never really moved me that much. So I thought I'd do the Zero as a palate cleanser, knowing that being a new tool Eduard product I would have few problems building it!

It turned out to be one of my favourite subjects of the last few years, an incredibly enjoyable build and one of the most rewarding painting and weathering jobs I'd done in a long while. It just went right. It also piqued my interest in the subject matter, so when the Type 32 "Hamp" was released this month, I grabbed one from Andy at Antics, and with my ast project finished earlier today I set about it. And here we are.

Hamp

As you can see, not much to say at this point, just a few hours spent gluing bits together, but the detail levels on Eduard's latest toolings are little short of spectacular.


And then some paint added to start things off - all Mr Color lacquers and some Tamiya lacquer in this case, to set the base for detail painting and weathering. I'm not using much of the included etch on this one, I'll see how paint and decals look in the relatively small cockpit. See you soon!


Sunday, 22 August 2021

 Is Klear Still Viable in 2021?


Simple premise - I first saw Klear used by the late Ted Taylor in Scale Models International more than 35 years ago. I was 14-15 at the time and wondered what this wonder gloss he was using was. Imagine my surprise when I found that you got it in the cleaning section of the Supermarket! And it was as good brushes as airbrushed?!? I was still three-four years from my first serious forays into airbrushing so it seemed perfect.


You know what? It was brilliant - once I'd worked out that you didn't use white spirit as a thinner or brush cleaner it clicked into place. And ever since I've been using it almost constantly for various things in modelling - I've certainly never applied it to any linoleum! One thing I have rarely used it for in years is glossing prior to decals. I simply moved into lacquers and my processes changed. I tend to go back to it when glossing large models as it it easy to apply in large quick coats than lacquers in my experience, less demanding of that wet edge, less likely to get vortex grit in sharp corners on large subjects. But largely not used anymore day to day.

Yesterday I was at a low motivational point, and decided to experiment with it as a gloss finish again, using some test pieces ad painting over Tamiya acrylics. I had been playing with greys and green for a while, so decided to gloss them up. The process was simple - the paint was applied (thinned with Tamiya lacquer thinner) and very lightly wet sanded with Trizact 3000 to smooth it. Then two light coats of Klear at low pressure thinned again with Tamiya lacquer thinner, and again sanded between and at the end with Trizact. 

The basic gloss. Certainly good enough for any decal application. Almost fool-proof application at low (10-12psi) pressure, the thinner keys it to the gloss, dries hard in a couple of hours. Another coat, another polish, done. Absolutely solid, hard coat and nice shine - more coats will, of course build more shine.


Then I decided to polish one of the test pieces with Turtle Wax Light-To-Medium polishing compound. The paint and plastic prep was nowhere as thorough as I'd do for an actual gloss finish - but I think the results are clear. It's as good as any other gloss I've cut and polished. 


My verdict? Yes, it's still totally viable and useable in 2021 as a glossing medium. It's no more or less risky than any other paint coat (i.e. basically anything that goes wrong will be something You've done, not the product - and I've failed in applying finishes many times in my modelling career - if you're not failing occasionally you're probably not pushing or learning).

Still useful, still relevant. Will I go back to using it regularly? Probably not, but it's a nice tool and skill set to refresh yourself with, and I may try it a few times on upcoming builds and see where it goes. 

Saturday, 21 August 2021

Airfix Beaufort

 Airfix 1/72nd Beaufort Mk.1

Great box art invites the modeller in!

So, time to get this thing started! The one thing I had decided to do fairly early on was to give the model a full rivet job. I can generally take or leave rivets in small scales, but I wanted to busy this one up some using simple techniques. so out came the pencil, some straight edges and dymo tape and the RB Models riveter!

The basic tools of combat when riveting.


You can use straight edges for long runs of rivets, but in all honestly, as long as you have some sort of guide line like an adjacent panel, you can work slowly and carefully freehand - if your rivet wheel isn't overly sloppy it won't tend to wander. But using a straight edge gives an insurance of sorts, so your choice!


I prefer to do most riveting before assembly commences, individual parts have fewer corners and awkward spots to deal with. I stay away from thing like seam lines on fuselage halves - I'll do them after sanding the seams to make all the detail marry up.


And the results - I didn't follow any plans for this, so it's basically an "added interest" feature that is imagineered from the detail provided. I couldn't find any plans covering rivet patterns, so as long as it busies up the surface, I'm happy. A light oil paint wash highlights the panel detail and rivets for the camera.


Friday, 6 August 2021

 Zvezda 1/144th Boeing 757


My very favourite airliner. I've waited a LONG time for this. I built the Minicraft kit that was released in around 1998-99 a few times, but to call it "disappointing" is to understate things slightly. So here we are, in 2021, with an all new tool Zvezda 757. Worth the wait? 100%! Beautifully moulded, fine but consistent detail, looks every inch the sleek, sinuous and predatory beauty the 757 is. I've been on the kit two days, and most of the major subassemblies are done. 


The wing and tailplanes aren't glued yet, but this is the basic model. I did scrape a vee in the fuselage halves at the join so I could fill the seam with black CA - glossy airliners mean you have to make the seam go bye-bye better than most others, and this will help prevent ghost seams opening up later. 


The satellite internet antenna on the spine fits perfectly too! 


Underside view showing fit of wing lower section. The kit includes standard wingtips and winglets as an option, and both RR and GE engines are ins the kit. Basically you can do any -200 series 757 from this model as provided. Clear cabin windows have a section to be cut off for the -200, indicating clear plans for a -300 down the line a bit (2022?)

More soon, nearly ready for some paint!

Thursday, 5 August 2021

 "Tamiya Decals Are Thicker Than Aftermarket Decals"


"You can never hide the carrier film". This is an ongoing trope in modelling circles. That Tamiya decals are too thick to effectively hide the carrier film, that you always wend up with a visible edge around them. That you should always seek aftermarket decals for your Tamiya kit in order to overcome this issue. Yada yada yada.

I've had some issues in the past when I've used water that is too cold. Apart from that I have thirty years of using them with no issues whatsoever. But. . . . when it all blew up again this week I decided to actually *test* the hypothesis. You see, I work in aerospace manufacturing. This gives me access to accurate, calibrated measuring equipment. You can see where this is going can't you?

So I picked a spare Tamiya decal (part of the anti glare panel from the 2016 F-14A kit). I picked a spare Cartograf decal (an upper wing roundel from the very recent Special Hobby 1/32nd Whirlwind). I soaked both in water until they came free from their backing paper. I then laid each face down on a piece of non-woven lint free paper (the sort that we use in aerospace to clean and wipe delicate things with) and then carefully cleaned the adhesive off of each with a cotton bud soaked in water. With both thoroughly clean I placed them on a piece of paper to dry. And then I took them to work. 


And here's how they looked once dry. The roundel is wrinkled but not creased, so would measure just fine. 


My weapon of choice is a digital micrometer. I prefer manual micrometers, but for this test decided to use a digital scale. I set it for metric (because I'm not in a third world country and don't use bananas day to day) and zeroed the display with it closed on the ratchet. For info this mic was calibrated in May 2021 and is next due for calibration in May 2022. So it's good enough for helicopters. 

First up the Tamiya decal. Again tightened until the ratchet clicked. 


That measures .013mm thick. For those who insist on using bananas, that is just over a half a thou (or one two-thousandths of an inch). It's THIN. 

Next up the Cartograf


That measures .017mm. Again, for those using bananas that is just under seven-tenths of a thou. 
Yes, you're reading that right. While there is less than two-ten thousandths of an inch in it, the Cartograf decal is THICKER than the Tamiya. And I measured this in several places. It's thicker. Simple as that. 
So whatever issues you're having, it's not because the Tamiya decal is thicker. Japanese decals use a thicker, gloopier adhesive, you can FEEL it on the sheet when wet. Remove that (or activate it properly with very hot water) and there's nothing to choose. 
The decals are fine, you may need to adjust your technique, but they're perfectly useable. 
Well, that's one myth destroyed. Next?

Edit - As expected someone said I didn't know what I was doing and that black is thinnest and it was an unfair test. So here's a multi colour decals from the same Tomcat sheet, using the same layers and colours as the Cartograf decal:- 


So, let's test it.


My god! It's thicker. . . by .002mm (banana counters that's less than one ten thousandth of an inch). The decals are NOT the problem. But someone will have moved the goalposts again by lunchtime to promulgate the myth. 

Ultimately I'll carry on using Tamiya decals because I know how to. 

  Decisions Decisions So it feels like every couple of years I do something on here and it rapidly fades out. I guess a lack of visitors rea...